Creating planners is a fantastic way to work from home and earn money. You have the freedom to choose your hours and make money while enjoying what you’re doing. One of the best things about this side hustle is that endless opportunities are available; you can create planners for parents, students, and even kids.
We have created this blog post to teach you how to start on your journey of creating planners at home. This blog post features everything you need to know, including how-to video guides and how to find the best resources so you can get started with ease.
Designing planners is a great side hustle that can generate extra money for you and your family. Working from the comfort of your home has many benefits; you can make money while staying in your tracksuit bottoms, with no pressure to get ready and apply makeup!
Another great benefit of creating planners from home is choosing your work and doing as much or as little as you want. You can fit your work around your and your family’s schedules, meaning you can prioritise your kids over work when needed. This amazing side hustle generates more than £12,000 a year on average, working 1 or 2 days a week.
This is a great way to make a new source of income for you or your family! Check out how to get started designing planners from home below.
CAN YOU MAKE MONEY SELLING DIGITAL/PRINTABLE PLANNERS?
Yes, you can make a thousand of pounds + a month selling planners! Right now, two formats of planners are in high demand with customers and make lots of money.
One planner format is a digital planner. The user will access this version through a digital device like a phone, tablet, iPad or computer. No physical product is created. Instead, all the writing and planning is done on the user’s device.
The second type of planner is a printable planner. This version is trendy as it is easy to design and sell. This is what we want to talk to you about today.
WHY WOULD YOU MAKE PRINTABLE PLANNERS TO SELL?
Why would printable and digital planners be a great way to make money? The popularity of planners is never ending, especially if you create a planner with undated extension packs and customisable options.

Designing and selling a product in the digital and printed product sector is a fantastic side hustle as it can become a passive source of income. Selling planners follows the ‘make one, sell many’ business model, which means much less work for you than the original creative ‘make one, sell one model.
A print-on-demand (POD) service and white labelling for your planner business make the process so much easier. POD services like Doxzoo print-on-demand, meaning you can send the planner from Doxzoo directly to your customers. The product will be white labelled, so it looks like it was posted from you, but all the printing, packaging, and posting are taken care of for you by Doxzoo!
Some examples of what you could design and sell are:
- eBooks
- planners
- t-shirts
- courses
- printable graphics.
One business model is not better than the other; both are necessary and can be highly profitable. But in this article, we will focus on creating your own sellable planners.
WHERE CAN YOU SELL PRINTABLE PLANNERS
Printable planners can be sold in many different places; it is best to list your planners on multiple sites, such as Etsy, Instagram or your website.
Etsy can be a great place to sell your printable planner as it is a global platform and can expose your planner to buyers worldwide.
However, we always recommend having your own website to sell your planners on, as there are fewer fees.
HOW TO CREATE A PRINTABLE PLANNER TO SELL
So far, we’ve covered the who, what, and when. Now let’s talk about how to create a printable planner to sell. To start making your planner, first, create a list of all the items you need. Get a pen and paper, and let’s get started!
DECIDE ON NICHE
First, decide on the niche for your planner. This is the topic and target market the planner will aim at. This niche will be at the centre of all stages of the design and planning process.
For example, let’s say you want to design a gardening planner. You will want to design it so that in the future, you will be able to add extensions (add-ons), as well as further versions and updated editions. Making more than one version of the planner will dramatically increase the number of customers who the planners will appeal, meaning more sales for you!
DECIDE ON A COUPLE OF STYLES
Once you have chosen the niche for your planner, next, choose the style.
The style encompasses the colour scheme, font choice, images and graphics, icons, borders, and dotted lines versus solid and script versus block lettering. The options are endless.
The planner style is significant to customers. Therefore, ensure you create a more minimalistic version and a more maximalist, decorative design to cater to a broader range of customers.
You can use the design programmes listed below to save your styles for future applications. We recommend canva as the best programme to use for a first-time seller.
DESIGNING THE FIRST PLANNER
How to design your first planner from home? The best thing is to start small and simple to get some practice.
All basic planners should include a yearly calendar with 12 months, which can be dated or undated. Next are the monthly (dated or undated) and daily views. You can experiment with different layouts, such as a horizontal or vertical view and include a quote instead of a notes section.
Whichever layout you choose, start with some basic pages until you get the hang of it. Once you have created a few pages, the process will become much quicker and easier.

DECIDE ON YOUR PLANNER CONTENT
Once you have decided on the niche and layout of your planner, it’s time to think about the content inside your planner.
Sticking to the example of a gardening planner, it will already contain the basics; a yearly, monthly and daily section. But to stand out and generate sales, you need to add more! Gardening imagery is not enough to encourage customers to purchase a planner. Place yourself in the shoes of your ideal customer and think about the types of things a gardener may want to keep track of.
For example, you could include things like:
- Information about what plants work well together and what plants won’t grow together
- A map of the planting zones and their degree of limitations
- A list of the most popular plants to grow
- A note section so the gardener can plan to water, planting, store, or cultivate seeds
- A scheduled plan for fertilising, watering, and harvesting
An endless list of things can be included in your planners to make them stand out from the crowd. Just make sure you choose your content based on what the niche is and what your customer’s unfilled needs are.
UTILISE MULTIPLE LAYOUTS AND VERSIONS TO SELL IN EACH STYLE
Every individual is different and has their own preferences about planner style. Some people will strictly just use vertical planners and refuse to use horizontal styles. Many customers prefer a week-to-view style, while others will only buy a day-to-view planner.
This is why it is essential to create several different variations of your planner, so you can cater to each person’s preferences and maximise your sales. Using the gardening niche again, you could include a weekly dashboard in the horizontal design and have a section for the user to record planting dates and watering times. Alternatively, you could create a vertical daily layout and debugging and fertilising habit trackers. Both versions of the planner will sell. But not to the same people.

WHAT PROGRAMS CAN I USE FOR DESIGNING A PLANNER TO SELL
You can use dozens of different methods to design your planner, but we believe the best approach is to employ the easy-to-use Canva platform.
- Get started with Canva
- Canva has a free option, so you can get started creating planners with a minimal upfront cost! We have designed lots of popular planners using Canva.
- Pros: There are so many great design options for free and extra premium options you can pay to use. Cons: When you want to resize a design, you have to do this manually rather than simply clicking a button and have it done for you, which, unfortunately, is a big one for me.
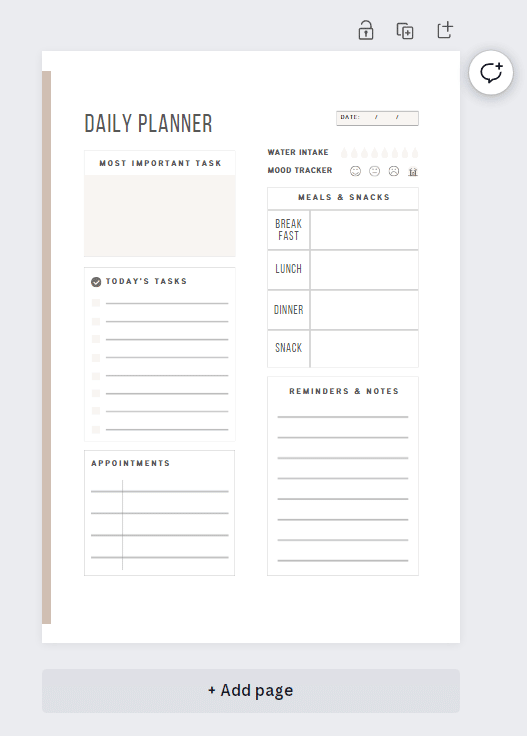
- We used Canva to create the following planner pages, and we might be biased, but I think they turned out beautifully.

DESIGN
Once you have created your planner in your chosen program, you can export it as a PDF in your preferred size. As with each stage in the planner design process it’s important to think what the customer wants.
You can ensure you’re appealing to your target market by reviewing the final planner, checking the layout and style is how you like it, while also keeping the customer in mind. For example, the benefits of a car maintenance checklist may be lost on a gardening fanatic, which could result in fewer customers and sales.
SIZE AVAILABILITY
The next step is deciding which sizes and formats you will sell the planner in. The variety of sizes you offer could massively impact the number of sales.
As someone who considers myself a planner-holic, here are the sizes I prefer and those I see sold most often.
- A4/A5/A6 are the most popular sizes used outside of the United States but are easily accessed in the USA. I use these interchangeably with the above sizes.
- Letter and half letter sizes are mostly used in the United States. They are equivalent to UK A4 and A5 sizes.
TWO MUST-HAVE SIZES TO MAKE AND SELL PLANNERS
Two must-have planner sizes are the UK Letter Size, which is closest to the A4, and the Half-page Letter, which is closest to the A5. There is a slight difference between the sizes; however, they work well if you ensure a large enough margin between the design and the edges for printing.
HOW TO USE DOXZOO & CANVA TOGETHER FOR A SEAMLESS DESIGN
Make sure to watch the short video below, which describes how to use Doxzoo and Canva together to create and sell your first planner as seamlessly as possible.
DON’T FORGET TO INCLUDE PRINTING INSTRUCTIONS
Your planner is ready to send to your customers! One last thing you need to do is include printing instructions. These are essential for your product to be received successfully. It is best to keep them concise but helpful.
Final steps- Setting up your Etsy store
If you’re an artist or creative, running a store on Etsy can be a great way to share your work and make a profit. If you have some beautiful designs you’d like to sell, why not make them into printouts? Calendars, posters, and custom prints are just some examples of lucrative printouts. People love to purchase them to spice up their interior design or gift them to their friends. You don’t even need to be business minded to sell your prints – with a store on Etsy, it couldn’t be easier. To give you a helping hand, we’ve compiled this handy guide on creating and selling the best prints on Etsy.
Why Choose Etsy for Your Print Store?
Etsy is a popular choice for those wanting to start a small business and bring their passion and products to the world. Opening an Etsy store immediately grants you access to over 81 million active buyers! This is why first-time business owners love Etsy, as the first stage of your growth is covered for you. This is thanks to their easily accessible platform, effective navigation, and built-in services, such as reviews. Etsy also offers you the chance to message your buyers directly and ensure they have a perfect customer experience.
How to Set Up Your Store on Etsy…
Setting up a store on Etsy is very simple, but there are a few things you should think about first. The first question to ask yourself is, what kind of buyers do you want to attract? For example, if you are selling prints of 18th-century artwork, you might like to target budding art lovers and luxury buyers. On the other hand, if you are selling prints of supercars, you may want to target a young male demographic. This will help you when it comes to how you brand your store.
After your planning stage, you can go ahead and follow these steps:
1. Sign Up For Etsy – all you need is your name, your email, and a password. Then, in the main menu, you can click the ‘Sell on Etsy’ button. Etsy will first ask you a few questions about you and your store so they know what kind of thing you’re offering.
2. Adjust Shop Settings – these are things like what currency you list your product prices in, and where you would like to ship your products. This will help Etsy know who to target and show your store to.
3. Choose A Store Name and Logo – remember, your store’s name needs to stand out and let your customers know about your prints, all in one. Make it snappy, and use high-quality imagery, to leave a perfect first impression.
4. List Your Prints – finally, once all your admin is complete, you can go ahead and start listing your designs for your printouts. Remember to price under your competition, but high enough to cover your margins from Etsy’s fees.
How to Provide the Highest Quality Prints…
A common problem new Etsy stores face is a lack of inventory and the initial costs associated with setting one up. When you’re selling your own prints, you can easily list the products with your existing designs. But when it comes to actually printing them, it’s a different story altogether.
This is where Doxzoo comes in.
Our expert printing business can help you provide high-quality prints and make a hefty profit too. We do all the printing work for you at competitive prices, so you can focus on creating more beautiful designs. All you need to do is send the final prints to your customers and watch the 5-star reviews roll in.
How Will a Dedicated Printing Business Benefit You?
When you’re running a small business, pleasing your customer is paramount. When they pay for your prints, they’re paying for the best, so your standard printer at home definitely won’t cut it. Here are some of the countless benefits of partnering with us, at Doxzoo:
- Do your artwork justice – when you’re creating beautiful art, the finished prints need to bring your vision to life. At Doxzoo we provide only the highest quality prints using the latest printing technology.
- Offer a variety of products – our printing business will help you expand your offerings beyond casual prints. You can adjust your sizes to give your customers more options, and sell large posters, too. Or, why not put your prints into a calendar or booklet with our help?
- Ensures a great customer experience – when your customers buy your prints, they’re expecting to receive the bang for their buck. When you choose to print with Doxzoo, your customers will love the beautiful colouring and perfect design replication that you offer.
- Affordable prices – no matter where you are on your small business journey, we have a printing package to suit your needs. We know how important it is for you to make a profit, so we price our packages to help new store owners live their printout store dreams.
So, what are you waiting for?
Set up your Etsy print store today, with the help of professional printing from Doxzoo.
If you have questions about our service or want to hear about our printing techniques, get in touch with us now! You can contact us at [email protected], and one of our expert team will be in touch within 24 hours. Or, contact us via LiveChat, and we can get you set up with printing services today.
Looking for a reliable printing company?
Get an instant quote
4 Comments
Hello,
If someone buys a planner through my etsy store does the order go straight to you, you print it and send to them Print on Demand or do you send to me to send to the customer?
Many thanks,
Hello, you would have to place the order on our site but we can then send directly to your customer. Any questions, drop us a message via live chat 🙂
Thank you , i so need ideas and things like this in my life ❤️💯
Get in touch if you have any questions 🙂